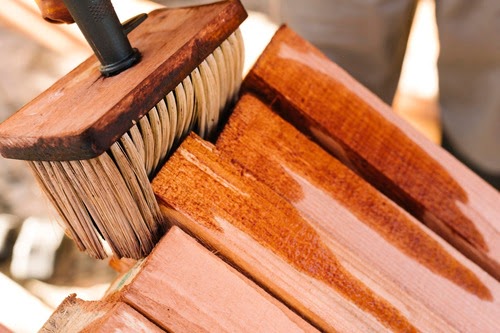
Wood Finishes

 Wood Finishes

Wood Finishes

Wood finishes are products applied to wood surfaces to protect and enhance their appearance, as well as provide durability and longevity to the wood. Wood finishes come in a variety of types, each with their own unique properties and characteristics. Some common types of wood finishes include oil-based, water-based, lacquer, varnish, shellac, and wax.

Wood finishes can be used on a variety of wood products, including furniture, cabinetry, flooring, and decorative objects. They can be used to bring out the natural beauty of the wood, enhance its color, and provide a protective layer against moisture, heat, and scratches.

The process of applying a wood finish typically involves several steps, including sanding and cleaning the wood surface, applying the finish, and allowing it to dry and cure. Depending on the type of finish and the desired effect, multiple coats may be required, and additional steps like staining or dyeing may be necessary.

Types of Wood
Finishes

There are several types of wood finishes available, each with its own characteristics and advantages. Here are some of the most common types:

  • Varnish: A clear or tinted liquid that creates a hard, protective coating over the wood. Varnish can be glossy or matte and is ideal for outdoor furniture and wooden boats.
  • Oil: A natural oil-based finish that penetrates the wood fibers and enhances its natural beauty. Oil finishes are easy to apply and maintain and are ideal for indoor furniture.
  • Wax: A soft, smooth, and shiny finish that is applied to the surface of the wood. Wax finishes offer a subtle, natural-looking finish that is ideal for antiques and traditional furniture.
  • Shellac: A clear, quick-drying finish made from a resin secreted by the lac bug. Shellac is ideal for indoor furniture and is known for its ability to create a rich, warm glow.
  • Polyurethane: A synthetic finish that creates a hard, durable coating over the wood. Polyurethane finishes are available in gloss, semi-gloss, and matte and are ideal for high-traffic areas.
  • Lacquer: A fast-drying, highly durable finish that is ideal for use on furniture and cabinetry. Lacquer finishes are available in a range of colors and can be glossy or matte.
  • Stain: A colored liquid that is applied to the wood to enhance its natural grain and color. Stains are available in a range of colors and can be combined with other finishes to create a custom look.

Choosing the Right Wood
Finishes for Your Project

Choosing the right wood finish for your project can depend on a variety of factors such as the type of wood you are working with, the desired level of sheen or gloss, the environment the finished piece will be in, and the level of maintenance you are willing to commit to. Here are some considerations to keep in mind when selecting a wood finish:

  • Type of Wood: Different types of wood absorb finishes differently, and some woods may require special preparation before applying a finish. Be sure to research the best finishes for your particular type of wood.
  • Desired Appearance: The level of sheen or gloss you want can also determine which finish to use. Varnish, polyurethane, and lacquer provide a glossy finish, while wax and oil finishes offer a more matte or natural-looking finish.
  • Indoor vs. Outdoor Use: If your project will be exposed to the elements, you will need a finish that is designed to withstand moisture, UV rays, and other environmental factors. Varnish, polyurethane, and outdoor oils are ideal for outdoor use.
  • Level of Maintenance: Some finishes require more maintenance than others. Wax finishes require regular reapplication, while varnish and polyurethane finishes can last longer with minimal maintenance.
  • Environmental Impact: Consider using eco-friendly finishes, such as water-based finishes, that contain fewer harmful chemicals and have a lower environmental impact.
  • Application Method: Some finishes require specialized equipment or a particular application method, such as spraying or brushing. Be sure to choose a finish that you are comfortable applying and have the necessary tools to do so.

Application Techniques
for Wood Finishes

The application technique you choose for your wood finish will depend on the type of finish you are using, the tools you have available, and your personal preferences. Here are some common application techniques for wood finishes:

  • Brushing: Applying the finish with a brush is a popular and straightforward method. A natural bristle brush is typically used with oil-based finishes, while synthetic brushes are better suited for water-based finishes.
  • Spraying: Spraying the finish with a spray gun or aerosol can provide a smooth, even finish. This method is typically used for varnish, lacquer, and other thin finishes. It's essential to use proper safety equipment when spraying finishes.
  • Wiping: Applying the finish with a cloth or rag can produce a natural, hand-rubbed look. This method is often used with oil and wax finishes.
  • Rolling: Using a paint roller to apply the finish is a fast and efficient method, but it can result in a slightly uneven finish. This method is best suited for large, flat surfaces like floors or decks.
  • Padding: Padding the finish onto the wood with a cotton pad or applicator can produce a smooth, even finish. This method is commonly used with shellac and French polish finishes.

Surface Preparation
for Wood Finishes

  • Sanding: Sand the wood surface to remove any rough spots, scratches, or blemishes. Start with a coarse-grit sandpaper and gradually move to finer-grit sandpapers, ensuring you sand with the grain of the wood.
  • Cleaning: Use a tack cloth or a clean, lint-free cloth to remove all dust and debris from the surface.
  • Filling: If there are any gaps or cracks in the wood, fill them with wood filler and allow it to dry completely before sanding.
  • Sealing: If you're using a stain or a water-based finish, you may need to seal the wood with a sealer or a sanding sealer to prevent blotching or uneven absorption of the finish.
  • Conditioning: Some woods, such as pine and cherry, may require conditioning before applying the finish. This process involves applying a pre-stain conditioner to even out the absorption of the finish.
  • Masking: Use masking tape to protect any areas you don't want to get the finish on, such as hardware or adjacent surfaces.
  • Testing: Before applying the finish to the entire project, test it on a small, inconspicuous area to ensure you're happy with the color and finish.

Maintaining and Repairing
for Wood Finishes

Maintaining and repairing wood finishes can help extend the life of your project and keep it looking beautiful for years to come. Here are some tips for maintaining and repairing wood finishes:

  • Regular Cleaning: Regularly clean your finished wood project with a soft cloth or a dusting brush to remove dust and debris. Avoid using harsh chemicals or abrasive cleaners, as they can damage the finish.
  • Avoid Excessive Moisture: Use a tack cloth or a clean, lint-free cloth to remove all dust and debris from the surface.
  • Refinishing: Over time, the finish may wear down or become damaged. If this happens, you may need to refinish the wood. Sand the surface to remove the old finish and apply a new coat of finish. Follow the manufacturer's instructions carefully.
  • Touch-ups: Small scratches or chips in the finish can be touched up with a matching finish. Apply the finish with a small brush or applicator, and allow it to dry completely before using the project again.
  • Waxing: If your finish is a wax finish, you may need to periodically apply a new coat of wax to maintain the shine and protection. Apply the wax with a soft cloth, and buff it to a shine.
  • Professional Help: If the damage is extensive or you're unsure how to repair it, seek professional help. A professional can assess the damage and recommend the best course of action.

Eco-Friendly & Non-Toxic
Wood Finishes Options

  • Natural oils: Sand the wood surface to remove any rough spots, scratches, or blemishes. Start with a coarse-grit sandpaper and gradually move to finer-grit sandpapers, ensuring you sand with the grain of the wood.
  • Beeswax: Beeswax is a natural, non-toxic option for finishing wood. It provides a soft, smooth finish that protects the wood from moisture and wear.
  • Shellac: Shellac is a natural resin that is harvested from insects. It's a non-toxic option that provides a high-gloss finish and is easy to apply.
  • Water-based finishes: Water-based finishes, such as acrylic and polyurethane, are non-toxic and eco-friendly options. They dry quickly and provide a durable finish that resists scratches and wear.
  • Milk paint: Milk paint is a non-toxic and eco-friendly option that provides a smooth, matte finish. It's made from milk protein, lime, and natural pigments.
  • Natural stains: Natural stains, such as tea, coffee, and fruit juice, are non-toxic and eco-friendly options for adding color to your wood project. They produce a subtle, natural finish that enhances the wood's grain.

Tips and Tricks for Achieving
Professional-Looking Wood Finishes

Achieving a professional-looking wood finish requires attention to detail and patience. Here are some tips and tricks to help you achieve a beautiful, high-quality finish:

  • Preparation: Proper surface preparation is essential for achieving a professional-looking finish. Take the time to sand, clean, and seal the wood before applying any finish.
  • Test the Finish: Always test the finish on a small, inconspicuous area before applying it to the entire project. This will allow you to make any necessary adjustments to the color or finish.
  • Apply Thin Coats: Apply thin coats of finish, rather than thick coats. Thick coats can lead to drips and uneven finishes. Allow each coat to dry completely before applying the next coat.
  • Sand Between Coats: Sand lightly between coats to remove any bumps or imperfections in the finish. This will help to create a smooth, even finish.
  • Use Quality Tools: Use high-quality brushes, rollers, or spray equipment to apply the finish. This will help to create an even, consistent finish.
  • Control Temperature and Humidity: Temperature and humidity can affect the drying time and finish quality. Make sure the temperature and humidity levels in the work area are within the recommended range for the finish you're using.
  • Finish the Edges Last: Finish the edges of the wood last to avoid drips or smudges on the finished surfaces.
  • Allow Time to Dry: Allow the finish to dry completely before handling or using the project. This will help to prevent any smudging or damage to the finish.